Maximize your Ethereum trading potential with 0xBuilder, a powerful framework designed for high-frequency trading and Maximal Extractable Value (MEV) strategies.
0xBuilder empowers you with tools for:
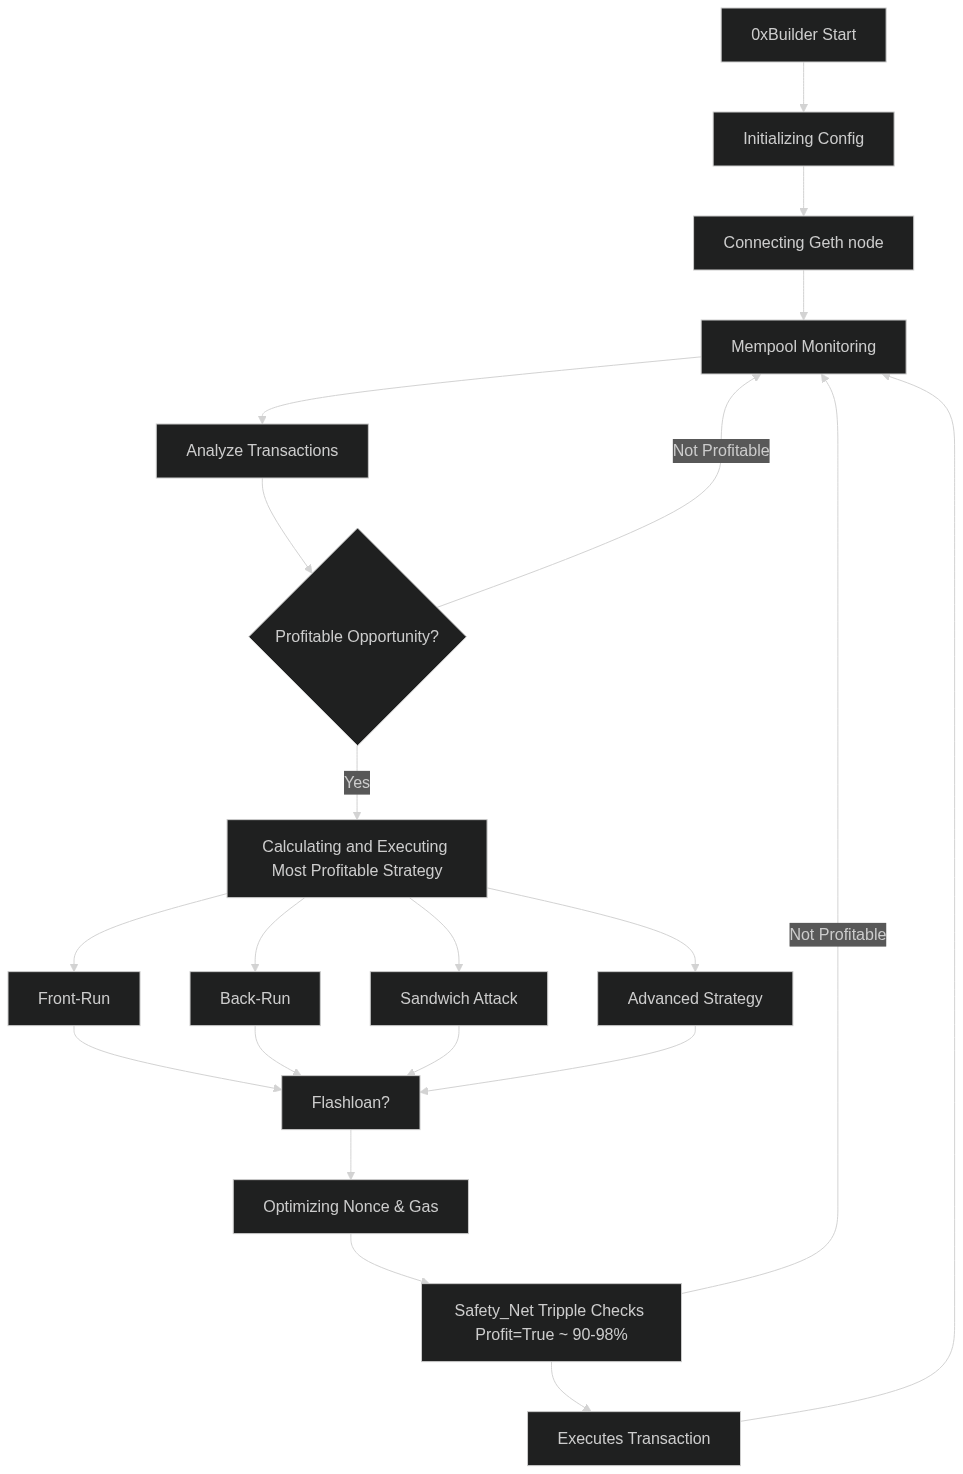
- Front-running: Capitalize on pending transactions for profit.
- Back-running: Strategically execute trades after specific transactions.
- Sandwich Attacks: Profit from manipulating transaction order in decentralized exchanges.
- Flash Loan Arbitrage: Leverage flash loans for zero-capital arbitrage opportunities.
⚠️ Important: Under Active Development
0xBuilder is currently in active development. Expect potential bugs and use with extreme caution. Your use is at your own risk.
0xBuilder provides a comprehensive suite of features for effective MEV exploitation:
- Mempool Monitoring: Real-time analysis of the Ethereum mempool to identify profitable opportunities.
- Advanced Trading Strategies: Implements sophisticated strategies like front-running, back-running, sandwich attacks, and flash loan arbitrage.
- Flash Loan Integration (Aave V3): Utilizes Aave V3 flash loans for capital-efficient trading.
- Data-Driven Decisions: Integrates with cryptocurrency APIs for real-time market data analysis.
- Gas Optimization: Dynamically adjusts gas prices to minimize transaction costs.
- Robust Transaction Management: Includes nonce management and atomic transaction bundling for reliable execution.
- Risk Mitigation: Built-in safety checks and risk assessments to protect operations.
- DeFi Protocol Support: Seamlessly interacts with popular DeFi platforms like Uniswap, Sushiswap, and Aave.
- Highly Configurable: Adaptable to various wallets, tokens, trading pairs, and strategies.
- Detailed Logging: Comprehensive logs for performance analysis, debugging, and strategy refinement.
/0xBuilder/
├── abi/                      # Smart Contract ABIs (JSON format)
├── contracts/                # Solidity Smart Contracts (Flashloan, Interfaces)
├── linear_regression/        # Machine Learning for Price Prediction (Models, Data)
├── python/                  # Core Python Bot Logic
│   ├── safetynet.py          # Risk Management & Safety Checks
│   ├── strategynet.py        # MEV Strategy Implementation
│   ├── mempoolmonitor.py     # Mempool Monitoring Engine
│   ├── marketmonitor.py      # Market Data Analysis
│   ├── main.py               # Main Bot Entry Point
│   ├── transactioncore.py    # Transaction Handling & Execution
│   ├── maincore.py           # Core Application Logic
│   ├── noncecore.py          # Nonce Management
│   ├── apiconfig.py          # API Integration & Data Handling
│   ├── configuration.py      # Configuration Loading
│   ├── abiregistry.py        # Centralized ABI Management
│   ├── 0xBuilder.log        # Default Log File
│   ├── __init__.py
│   └── pyutils/              # Utility Modules
├── utils/                    # JSON Configuration Files (Tokens, Signatures)
├── .env                      # Environment Variable Configuration
└── requirements.txt          # Python Dependencies
- Operating System: Linux (Ubuntu 20.04+ recommended), Windows 10/11, macOS 12+
- Internet: Stable connection (50Mbps+ recommended)
- Hardware:
- CPU: 4+ cores, 3.0GHz+ (e.g., Intel i7 or equivalent)
- RAM: 16GB minimum
- Storage: 1.5TB NVMe SSD (for local Ethereum node synchronization)
- Python: Version 3.12 or higher
- Ethereum Execution Client: One of:
- Geth (Recommended)
- Nethermind
- Besu
- Erigon
- Reth (Testnets only)
- EthereumJS
Run your own Ethereum Execution and Consensus (Beacon) client. Geth and Prysm are highly recommended.
- Install Geth: Follow Geth installation guide.
- Start Geth Node:
./geth --mainnet --syncmode snap --http --http.api eth,net,admin,web3,txpool --ws --ws.api eth,net,admin,web3,txpool --maxpeers 100 --cache 16000 --ipcpath ~/0xBuilder/geth.ipc --allow-insecure-unlock --http.corsdomain "*"
- Verify Sync:
Wait until synchronization is complete.
geth attach ipc:/path/to/geth.ipc
> eth.syncing
Use Prysm or Lighthouse.
./prysm.sh beacon-chain --mainnet --checkpoint-sync-url=https://beaconcha.in/api/v1/genesis --genesis-beacon-api-url=https://beaconcha.in --http-web3provider=/path/to/geth.ipc-
Clone the Repository:
git clone https://github.com/John0n1/0xBuilder.git cd 0xBuilder -
Create a Virtual Environment (Recommended):
# Linux/macOS
python3 -m venv venv
source venv/bin/activate

# Windows
python -m venv venv
.\venv\Scripts\activate
-
Install Dependencies:
python -m pip install --upgrade pip
pip install -r requirements.txt
0xBuilder uses environment variables and JSON configuration files for customization.
- Copy Example .env:
cp .env.example .env
- Edit .env: Configure values such as API keys, Ethereum node endpoints, wallet details, and file paths.
Customize the following files:
- token_addresses.json: Map token symbols to contract addresses.
- token_symbols.json: Map token symbols to API identifiers.
- erc20_signatures.json: Define ERC20 function signatures.
Deploy the SimpleFlashloan.sol contract using Remix:
-
Open Remix IDE.
-
Create a new file
SimpleFlashloan.soland paste the following code:// SPDX-License-Identifier: MIT pragma solidity ^0.8.20; import "https://github.com/aave/aave-v3-core/blob/master/contracts/flashloan/base/FlashLoanSimpleReceiverBase.sol"; import "https://github.com/aave/aave-v3-core/blob/master/contracts/interfaces/IPoolAddressesProvider.sol"; import "https://github.com/aave/aave-v3-core/blob/master/contracts/dependencies/openzeppelin/contracts/IERC20.sol"; contract SimpleFlashLoan is FlashLoanSimpleReceiverBase { address payable public owner; event FlashLoanRequested(address token, uint256 amount); event FlashLoanExecuted(address token, uint256 amount, uint256 premium, bool success); constructor(address _addressProvider) FlashLoanSimpleReceiverBase(IPoolAddressesProvider(_addressProvider)) { owner = payable(msg.sender); } modifier onlyOwner() { require(msg.sender == owner, "Not contract owner"); _; } function fn_RequestFlashLoan(address _token, uint256 _amount) public onlyOwner { emit FlashLoanRequested(_token, _amount); POOL.flashLoanSimple(address(this), _token, _amount, "", 0); } function executeOperation( address asset, uint256 amount, uint256 premium, address initiator, bytes calldata params ) external override returns (bool) { require(IERC20(asset).approve(address(POOL), amount + premium), "Approval failed"); emit FlashLoanExecuted(asset, amount, premium, true); return true; } function withdrawToken(address _tokenAddress) public onlyOwner { IERC20 token = IERC20(_tokenAddress); uint256 balance = token.balanceOf(address(this)); require(balance > 0, "No tokens to withdraw"); token.transfer(owner, balance); } function withdrawETH() public onlyOwner { uint256 balance = address(this).balance; require(balance > 0, "No ETH to withdraw"); owner.transfer(balance); } receive() external payable {} }
-
Compile and deploy using Remix.
-
Update your
.envfile with the deployed contract address:AAVE_FLASHLOAN_ADDRESS=0xYourDeployedContractAddress
Obtain API keys from:
Add your keys to the .env file.
Ensure:
- Your Ethereum node is fully synchronized.
- The
.envfile and JSON configuration files are correctly set. - Your wallet is funded with enough ETH to cover gas costs.
Steps:
- Activate your virtual environment:
# Linux/macOS
source venv/bin/activate

# Windows
.\venv\Scripts\activate
- Start 0xBuilder:
python python/main.py
0xBuilder includes a range of MEV strategies:
Front-Running Strategies:
- Aggressive Front-Running
- Predictive Front-Running
- Volatility Front-Running
- Advanced Front-Running
Back-Running Strategies:
- Price Dip Back-Running
- Flashloan Back-Running
- High Volume Back-Running
- Advanced Back-Running
Sandwich Attack Strategies:
- Flash Profit Sandwich Attack
- Price Boost Sandwich Attack
- Arbitrage Sandwich Attack
- Advanced Sandwich Attack
Other Strategies:
- High-Value ETH Transfer Monitoring
Detailed logs are written to python/0xBuilder.log and also output to the console. These logs provide insights into:
- Mempool activity
- Strategy execution and performance
- Profit tracking
- Error and exception details
Common Issues:
| Issue | Solution |
|---|---|
| Node Connection Errors | Verify your Ethereum node is running and that the endpoints in .env are correct. |
| API Rate Limit Exceeded | Throttle requests or upgrade your API plan for higher limits. |
| Insufficient ETH Balance | Ensure your wallet has enough ETH to cover gas costs. |
| Nonce Synchronization Problems | Restart the bot or reset the nonce manually if necessary. |
| Ethereum Node Not Synced | Wait until your Ethereum client is fully synchronized before running the bot. |
| Flash Loan Contract Issues | Verify your flash loan contract is deployed correctly and the address is correct in .env. |
Debugging Tips:
- Enable verbose logging by setting the log level to
DEBUGinpython/maincore.py. - Ensure all dependencies are installed (
pip install -r requirements.txt). - Test on a testnet (e.g., Sepolia) before deploying to mainnet.
- Review logs in
python/0xBuilder.logfor detailed error messages.
Contributions are highly welcome! To contribute:
- Fork the repository.
- Create a new branch for your feature or bug fix.
- Write your code following PEP 8 guidelines and add tests.
- Submit a pull request with detailed descriptions of your changes.
See CONTRIBUTING.md for more information.
This project is licensed under the MIT License. See the LICENSE file for details.
Disclaimer:
Trading and MEV strategies involve significant risk. Use 0xBuilder at your own risk. The developers are not responsible for any losses incurred using this software.